Dining Room Chairs Update


The last time I hit up my local Habitat for Humanity ReStore, I think the thrifting gods were smiling down on me. Remember how I scored a set of vintage Readers Digest books? Well, I also scored two really sad little Parsons dining room chairs. 


Me: Babe! I found these amazing dining room chairs at ReStore today for only $5 each!
David: Um. I know you probably have a vision, but they're black corduroy. And ripped. And ugly.

Well of course I had a vision! And for $10, I thought it was worth a shot. I ran home and Googled "Parsons chair slipcovers." There were a ton of tutorials out there on how to make a slipcover, but ya'll know me and my complete lack thereof sewing skills, so that wasn't an option. 

I went back and forth between choosing a funky, colorful pattern and a simple, neutral cover. Most stores don't sell patterned Parsons chair slipcovers. I could have had one made from Etsy, but that was a) expensive and b) I decided to take the simple, neutral cover route. I don't want anything in that dining room trying to compete with my navy blue walls!

So the hunt began. Many of the slipcovers were too small for the chairs I purchased, especially with the slight roll on the back of them. So I searched. And I searched. And I searched. Too big. Too small. Too short. It was definitely the Goldilocks syndrome. And then I hit the jackpot, in the form of... wait for it... KMart! Yup. Hello large, neutral, $13 (with shipping) slipcovers. I think I love you.


Once they arrived on my doorstep from KMart.com, I immediately put the covers on the new chairs (which, by the way, I cleaned and Febrezed within an inch of their lives as soon as I got them home). Hm. Slight problem (besides the fact that they need to be ironed). These cheap little guys are kind of see through. My slipcovers need a slip!

Here's where many of you would get creative and sew a slip or come up with some other fancy way to fix the see-through problem. Not me. I simply grabbed some old white curtains that were in my linen closet (note: they are very thin, almost linen-like material), wrapped one around each chair and pinned each up to my heart's satisfaction. Hey, I'm easy. TWSS.


And it worked! Once I ironed them, the slipcovers went right over their slips and see-through Sally was no more!  For a grand total of $18 a chair ($5 chair + $13 slipcover), I think I've done pretty good.


I'm absolutely loving the thrifted Parsons chairs at the end of my tables with my collection of painted vintage chairs. And my vintage, I mean from my mom and dad : )


(ignore that little table/lamp in the corner, it's just waiting on a home!)


Not sure what's going on with that glowing greenish light in my living room in this picture?! And yes, that is a house plant in the middle of my dining room table. Don't judge. Trust me, there ain't nothing green to bring in from my yard thanks to this scorching Georgia heat, so I have to work with what I've got.

I still need to get some art on the walls in this room. You might have seen some options laying on the floor throughout the room- it's taking me awhile to decide what I want! And I'd really love to add a bench on one side of the dining room table to complete the piecemeal look that I'm going for with the table and chairs. Overall though, I think this room is really coming together.

Especially when you consider that it looked like this for about a year of us living in the house!

BEFORE


AFTER


Have you thrifted anything fun lately?


Sharing with:

Lots of Winners Over Here!

Guess who has a winner for the Susan Posnick $75 cosmetics giveaway?


Drumroll please... the winner is #65, Tracy J!


Congratulations, Tracy! Please email me with your contact information!

***

In other winning news, I've got a fun announcement. Our bathroom renovation project won this week's Before & After contest series over at One Project Closer!


One Project Closer first launched the Before & After series in 2008 to help raise support and awareness for Habitat for Humanity. Every week OPC is making a $100 donation to Habitat in honor of that week's winner, and look for the weekly fun fact to learn more about what Habitat is doing all over the world. Needless to say, I'm so excited about the win!

The contest series is actually still going on! So if you've completed a do-it-yourself project within the past year, send a short story and photographs to BeforeAndAfter@OneProjectCloser.com. The winner gets a $50 gift card to Home Depot or Lowes and $100 donated in their name to Habitat for Humanity. The last winner will be selected on September 17, 2011, so don't forget to enter soon!

And thanks again to the OPC crew for the win!

On the Burner: Gourmet Hamburgers & Zucchini Fries

As the dog days of summer are drawing near, we're all scurrying around trying to soak it all up. Only a few more afternoons by the pool, picnics by the lake or romps through the sprinklers.

One last thing to hold on to? Summer food. There's nothing like it- the perfect summer meal is simply firing up the grill and adding fresh vegetables from your garden. David and I recently made an amazing summer meal straight from the pages of Barefoot Contessa's How Easy Is That?


The recipe is actually for sliders, but we decided to do full-sized burgers instead. We were hungry. Increasing the size made the patties slightly crumbly, but it certainly didn't bother us. It was gooood.

INA'S HAMBURGER SLIDERS

INGREDIENTS
  • 2 pounds premium ground beef (80 percent lean and 20 percent fat)
  • 1 tablespoon good Dijon mustard
  • 3 tablespoons good olive oil, plus extra for brushing the grill
  • 1 teaspoon chopped thyme leaves
  • 3 teaspoons chopped garlic
  • 1 teaspoon kosher salt
  • 1 teaspoon freshly ground black pepper
  • 6 ounces grated Gruyere
  • 12 small Brioche buns (I used whole wheat onion buns)
  • 4 ounces baby arugula
  • 3 medium tomatoes, sliced in 1/8-inch-thick rounds
  • 2 small red onions, sliced in 1/8-inch-thick rounds
  • Ketchup, for serving

DIRECTIONS

1. Build a charcoal fire or heat a gas grill.

2. Place the ground beef in a large bowl and add the mustard, olive oil, thyme, garlic, salt, and pepper. Mix gently with a fork to combine, taking care not to compress the ingredients. 


 3. Shape the meat into 12 (2-inch) patties of equal size and thickness.

4. When the grill is medium-hot, brush the grill grate with oil to keep the sliders from sticking. Place the sliders on the grill and cook for 4 minutes. Turn the sliders over with a spatula and cook for another 4 to 6 minutes, until medium-rare, or cook longer if you prefer the sliders more well done.

5. For the last 2 minutes of cooking time, place 1/2-ounce Gruyere on the top of each burger and close the grill lid. Remove the sliders to a platter and cover with foil.


 6. Slice the buns in half crosswise and toast the halves cut side down on the grill.
Divide the baby arugula among the 12 bottom buns, top each with a slider, and finish with a slice of tomato and red onion. Cover with the top of the bun and serve hot with ketchup. 

You can find this recipe here.

As a side dish, I made amazing zucchini fries that I found here over on Natasha's blog, Schue Love.

AMAZEBALLS ZUCCHINI FRIES

INGREDIENTS 
  • 3 zucchini
  • 1 egg white
  • 1/4 cup of milk
  • 1/2 cup of shredded Parmesan cheese
  • 1/2 cup of seasoned Italian breadcrumbs (I used Japanese Panko crumbs- fabulous texture!)


DIRECTIONS

1. Spray two cookie sheets with cooking spary.  
 
2. Slice up the zucchini into little french fry slices.  
 
3. Mix the milk and the egg white in a bowl.  Mix the breadcrumbs and Parmesan cheese in a separate bowl. Dip each zucchini slice first into the milk/egg mixture then coat in the Parmesan/breadcrumb mixture.  
 
4. Bake at 420 degrees for 20 minutes.


Yum, right?


David and I were happy campers at the end of this meal!
Are you cooking up anything fun to celebrate the end of the summer?

TV Stand Dresser Mini Makeover

One of my verrrry first posts way back when was about the makeover of our living room. It's the room we spend the most time in and so it was the first to be attacked as soon as we moved in.We painted, ordered some new furniture and basically took the room from this:


to this:


One of the big things that we did in the room was to revamp a Craigslist dresser as our TV stand. David and I only have one TV in the house (we're a no-TV-in-the-bedroom kind of family), so we felt that this solo guy needed a proper piece of furniture to hold it up.

Here's the breakdown of the dresser hunt from my first post:

Next, it was time to get some storage-type furniture into the room. While I shopped and shopped, I couldn't bring myself to spend $200+ on any retail furniture to hold the TV. And yes, after four years of an old school 20" tube TV and saving our pennies in anticipation, the hubster got a new (slightly too large for my taste, but what are you going to do) flat screen with the big move. But where to put it?
 
Enter: Craigs List, where we found a used dresser being sold for only $60. Unfortunately, I didn't do a great job at getting any before photos of the dresser (this was pre-blogging!), but let me tell you, it was a beauty! And by beauty, I mean... a pastel painted nightmare. We purchased the dresser from a very sweet lady (after driving to her home in Middle of Nowhere, Georgia) who just didn't have the best taste in the world. Apparently she had "refinished" the dresser on her own by painting it pink, green, yellow, white, and blue. This is where we Southerners say "bless her heart!" instead of anything negative, so I'll leave it at that.

The worst part? David and I didn't have the heart to tell her we were planning to
refinish her "refinished" dresser, so... when she asked where we were putting the dresser, we may have led her to believe that we were using the dresser in a pink, green, yellow, white, and blue pastel bedroom. True? Not so much. But I could't let her down! We laughed the entire way home about that one. There were some great details on the front and the size was perfect (and we haggled her down to $50), so we loaded it up and it came home with us! 

The side of the dresser as we painted the living room.


The front of the dresser drawers, which give you an idea of the (awesome) finish.


The short version is that I stained the hardwood beauty within an inch of its life, pulled the drawers out to create shelves for the electronics, Mod Podged some scrapbook paper as shelf liner and added new hardware. The end result we've had for the last 1.5 years? This beaut:


The TV stand dresser been absolutely perfect for us and I love the character its brought to the living room. But... as all of us do... I recently decided it was time for a little change. Things just weren't sitting perfect with me and the TV stand dresser. Then I found this image from Ballard Designs:


And fell in love. The white paint brightens and lightens the back of the dark piece, adding a pop of crisp and clean. I was sold. And thank goodness I keep about ninety-five cans of white trim paint in my basement- so this project was virtually free! Things really came together when I found some beautiful blue and white knobs at 50% off at the Hobby Lobby knob sale. So maybe it wasn't $0, but a $12 makeover. Not too bad! The knobs are the perfect complement to the new look, don't you think?


Unfortunately, I was a bad DIYer and decided to take the easy way out- I actually just painted straight over the Mod Podged shelf paper. I know, I know. But I tried to pull it off and it was just all kinds of disaster. Big clumps of paper and glue... I thought it'd just be easier for now to paint straight over the smooth surface. Except that the paper then bubbled all over the place a little bit. Any suggestions on how to get Mod Podged paper off wood? If someone gives me some good input and comes over to help me, I might try and pull the paper up and then repaint. Maybe.


The only thing I don't like about the makeover is that the black cable cords stand out a bit more than they used to. I am sure I could tape them down or buy some white ones to smooth over the look. But overall, I love the new lighter, brighter look over in that corner of the living room. 

Have you given any furniture around your house a mini-makeover lately?

*****


If you haven't already, don't forget to enter the Susan Posnick cosmetics giveaway, worth $75! 


Sharing with:
Thrifty Decor Chick
Between Naps on the Porch


The Genie Series: Schue Love


 Guess who is stopping by Ten June today? My blogger turned real life friend, Natasha from Schue Love!! She's here to participate in the Genie Series. I was lucky enough to meet Natasha when I was out in California last month- she is the SWEETEST! Not to mention she's absolutely adorable and she's got some amazing style... so if you haven't stopped by Schue Love, you need to click on over!


my sister, Tori- me- Courtney- Natasha

Natasha- if a genie popped up and gave you three wishes... what would they be?
 
Hello to Ten June's sweet readers!  I am super excited to be here today...I mean, who wouldn't want the chance to dream up three wishes?!  Thanks to Michelle for letting me indulge, if only for today!  :)

My first wish would be to have unlimited spin and barre classes to take at my disposal.
Untitled
It sounds like a strange wish, but these are two of my favorite classes and we have few if any available here in Tahoe.  If I could have a class available every day, all day, I would be SUCH a happy lady!

My second wish would be to visit Monet's Garden.
Untitled
My mom went when I was little and brought my back the Linnea doll...and I've known that I've always wanted to visit myself one day.  It's one of the many places I want to go to {I've never been overseas!} but if I had a wish, I would go there!

My last wish would be to have a personal stylist/shopper!


Untitled


While living in Tahoe is gorgeous, the shopping is a little slim {to say the least!} so how fabulous would it be to have a stylist shop for me and send me all the most trendy clothes and accessories?  Maybe I should include...with unlimited budget?!  :)

Thanks for letting me dream today!  Now if only I could find one of those little Genies somewhere!!!

xo natasha

 Thanks for stopping by, Natasha!

****


If you haven't already, don't forget to enter the Susan Posnick cosmetics giveaway, worth $75! 

Susan Posnick Cosmetics Giveaway

Today I'm joining the ranks of Hello Splendor, Aspiring Kennedy and A Diary of Lovely over at Susan Posnick Cosmetics for the "What is Your Muse" guest post series.

And you guys are in for a treat, because after you stop by and read my guest post, come on back to Ten June for a giveaway of $75 in Susan Posnick Cosmetics.

And yes, you heard me right. Susan Posnick is giving away $75 worth of merchandise over here on Ten June today. I have tried the cosmetics and can definitely say they're fabulous. The makeup feels clean and fresh, which is a must for me. I think my favorite SP product is the eyeliner/eyeshadow duo- it's fabulous! So, who's excited?! Here are the rules:

T H E  G I V E A W A Y  R U L E S :

You have a few different ways to enter this giveaway.
Please leave a comment on this post for each type of entry and share how you entered.

1) One entry for stopping by the SP Cosmetics blog and leaving a comment. 
2) One entry for becoming a follower of Ten June.

4) One entry for following @SusanPosnick and @tenjuneblog on Twitter.

I'll leave the giveaway open until midnight on Saturday, August 27th, 2011.
Good luck to everyone!

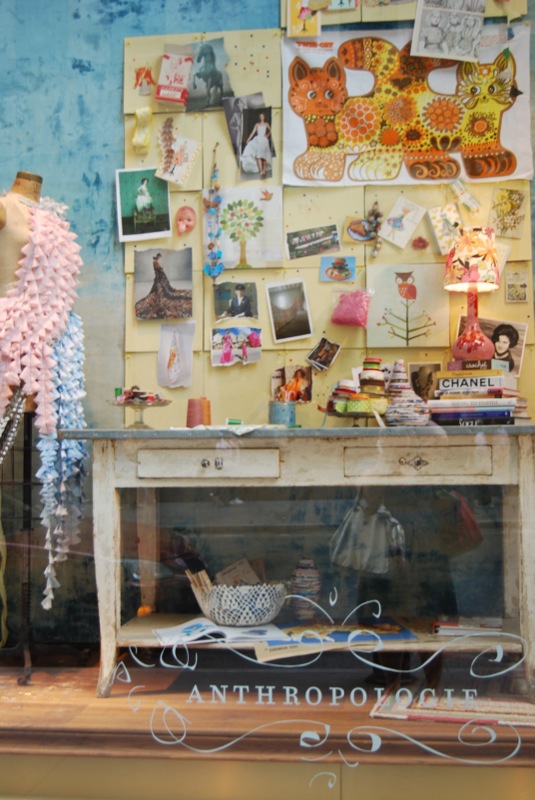
Anthropologie Inspiration

While I love flipping through shelter mags and spending hours browsing Pinterest, my favorite sources of inspiration are oftentimes the more random ones. In fact, I realized the other day that much of my "inspiration" folder is filled with images from all kinds of sources. I think it must be the DIYers brain- everything you see can become a project for the home!

One of my favorite non-traditional sources of inspiration is Anthropologie. Of course, I love the brand and its clothing, shoes, jewelry and home line. But have you noticed that these stores have amazing window and in-store displays? They're certainly inspirational and get my little DIY brain wheels turning!

I love the height and texture in this display.


Hello re-purposed items! Is that an old radiator? Fabulous.


Paper cups. That's all I've got to say.


My absolute fav-or-ite. Hands down. The garlands are just gorgeous!


I'll take one of these vignettes in my home!

anthropologie window display

Anthro definitely has a way with books... with chalkboard paint....

shelf life

Dangling in the air....


Or even piled high! They look so chic.


A Christmas wonderland! But you could easily recreate a year-round version of this with any kind of trinket piled high. Or on a smaller scale, you could recreate with a knick knack shelf like mine.


Love the organization, love the colors.


Adorable. 


What random places do you pull inspiration from?
Related Posts Plugin for WordPress, Blogger...