Hi friends! Hope all of you had a great weekend. I'm back today with a fun tutorial I created for making DIY blackout curtains.
I've known for awhile that I wanted to have a yellow + white + baby blue + navy blue color scheme in my little man's nursery. So when I saw these adorable navy blue gingham curtains at Pottery Barn Kids, it's no surprise that I fell in love. Perfect for the nursery! But not so much a perfect price. While they're on sale now (of course!), each panel was originally $79 and I needed four... with taxes and shipping, we're talking almost $375. Not exactly within the nursery curtain budget!
And then inspiration hit in the form of our favorite Swedish cheap-o decor center. Waaay back in April (remember this post?), I came across an amazing deal on navy blue gingham fabric at Ikea. For some reason, the fabric was displayed at $3.99/yard instead of it's normally priced $8.99/yard... so they gave me the deal! Seriously exciting if you need a lot of fabric, like I did. Since I knew I wanted to make longer curtains (around 96" tall) I went ahead and grabbed 14 yards of the material for a whopping $55.86. Heck yeah.
This is the point in time where I got home, looked at David, told him I bought a ton of cheap, adorable fabric and that I now needed to learn how to make DIY blackout curtains for the nursery. Blank stares all around. Fast forward to July, when I finally got motivated and figured it all out! Ha.
After finding a few awesome tutorials online (like this one and this one), I sort of created my own hodge-podge curtain-making tutorial as I went. I'm certainly no professional (so take my advice with a grain of salt), but thanks to my new sewing machine, I think I've cranked out some pretty awesome curtains! Here's the how-to.
Honestly? This was probably the hardest task in this entire process. As you can see, I was working with a loooot of fabric. I kind of sat there and looked at it for a few hours, terrified to cut. After sixteen a few times of running back and forth to the nursery to double check my measurements, I finally came up with a formula. I planned to use a curtain rod with clips, so I measured from where the clips would hang (the rod would go as "high and wide" above my window as possible) all the way to the floor. 94 inches was my magic number. Then most tutorials recommended adding 10" to that figure for hem allowance. 104 inches per panel. Boom.
As you can see, I devised a little painters tape + dining room table measurement and cutting system, but do whatever works for you. Just make sure you have a big place to spread out since you are cutting big ol' long panels!
By the way... at this point, I realized that one panel would more than cover the width of an entire window in my nursery. In the room, there are just two small single windows, so there's not really a whole lot of window to cover. So I decided that even though I had enough for four panels, I was only going to complete two panels for the room, for now. I figured I can always make two more panels but didn't want to overwhelm the small room with heavy curtains. But I imagine that these adorable navy blue curtains can grown with our little man into a big boy room one day and in another house, we may want two panels per window, so I cut the fabric for the other two panels and tucked them away for safekeeping.
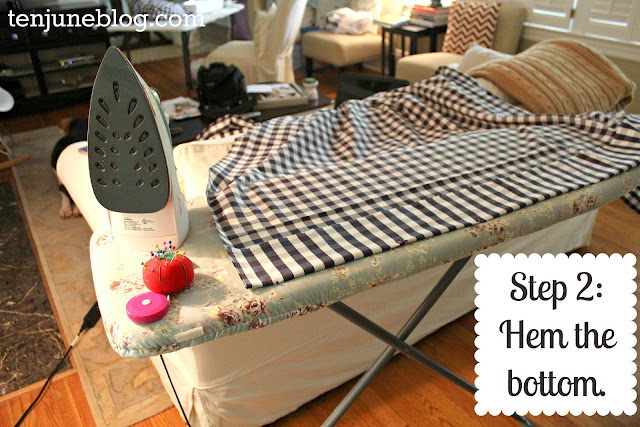
Alright, let's start at the bottom of these suckers, one panel at a time. Fold your bottom hem up four inches and then iron. By the way... I never realized how helpful ironing is in sewing. It really helps set your fabric to pin and sew! Duh, Michelle. Then go ahead and fold your hem up again another four inches and iron, so you've got a double-wide hem at the bottom of your curtain. Then pin and sew a straight stitch across the hem to keep it in place. Don't forget to back stitch at the beginning and end!
PS. Don't you just love the chaos in the background that is my living room while I'm working on a project? Oh, the life of a DIYer ; )
Now it's time to add the lining. I picked up my blackout liner at JoAnn Fabrics on sale- normally $6.99/yard but it was 50% off. I bought 13 yards of the liner for about $45.44. Now comes another scary cutting part... but luckily you already know your curtain measurements (remember, mine is 94 inches), so you just add 2.5 inches to that number and cut that length for the liner.
A lot of the tutorials out there suggest that the blackout lining should be about 6 inches less than your regular fabric in width. I'll explain why in a bit, but make sure your blackout lining is not as wide as your fabric. Mine was actually already pre-cut with less width than my regular fabric, so I didn't have to cut the sides down, but you may have to. Just 6 inches off the width of your regular fabric.
Just like we did with the regular fabric above, we're now going to fold, pin and sew the bottom hem of the liner fabric. Fold the bottom of the fabric up 2 inches and iron. Then fold up another 2 inches, iron and then pin it down. You'll make another simple straight stitch across this hem to hold it in place.
By the way, I think I used the back of my liner fabric as the front... the "front," I believe, is technically the off-white color. But I wanted the bright white side to show through, so I made it my "front." Hey, it works for me because it looks cuter : )
Now it's time to put these two pieces together. Ack! We're working with a lot of fabric here, so just be patient. I headed back over to my dining room table to measure all of this off. Lay both fabrics so that the right sides are facing one another. So for me that meant the front of my gingham print faced up and the white "front" of my liner fabric faced down, so that they were facing one another. Make sense?
Lay the hemmed bottom of your liner fabric about 1.5 inches from the bottom of the hemmed regular fabric. Then line up one side of the liner fabric along with the regular fabric and pin in place.
Once you get that pinned into place, it's time to pin the other side of the liner fabric to the other side of the regular fabric. Don't forget that the liner fabric is about six inches less wide than your regular fabric. So when you begin to pin the other side of the liner fabric to the regular fabric, you'll have to bunch up some of the regular fabric in the middle. It all works out, though, I promise! : )
Then you sew your pinned edges into place with a straight stitch. It seems like a daunting task because there is so much fabric going on, but I promise it's pretty easy! Just do one side at a time, straight down the edge.
Okay friends, here's where you start to feel like you're making a curtain! Once your sides are stitched up, turn the fabric inside out so that both fabrics are showing their beauty sides. At first it looks like a hot mess, but then... all of a sudden... it looks like a curtain!
Once you unfold the fabric, iron the sides down so that they're nice and neat. Makes me say ahhhh.
Next, we tidy up the corners. Simply fold the corner underneath and either stitch with a needle or maneuver your fabric so that your only blind stitching the top piece (obviously you don't want the thread to go through to the front side of the curtain). That might not be very technical in terms of sewing terminology, but that's what I did!
ALL we have left, my friends, is to hem the top of the panel. Just like we did before, fold the top down about 1 inch, then iron. Then fold down one more inch and iron, pin and sew into place with a straight stitch seam.
Guess what? We're done! That's it! You've got yourself a curtain.
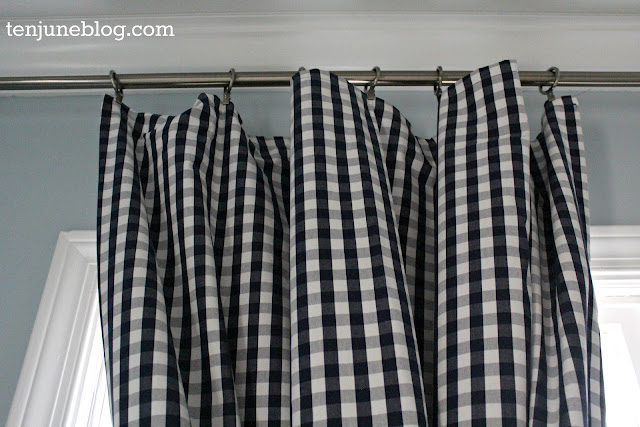
Now check out my sweet little gingham guys hanging in the nursery!
Because we're only using one panel, for now, I decided to bunch the curtain up in the middle with some grosgrain ribbon when we're ready for some daylight. It looks a lot more balanced than just placing the curtain to one side!
Here's what the panel looks like fully extended.
You can see that I simply clipped the top of my curtains with clip rings. Definitely easy!
I absolutely love the sweet gingham look in the nursery.
Oh and as you can see, we're pulling lots of navy into the room with items like the painted kiddo rocking chair and other accessories. We even decided to bring our navy blue nesting tables from the living room into this space as a side table for the glider.
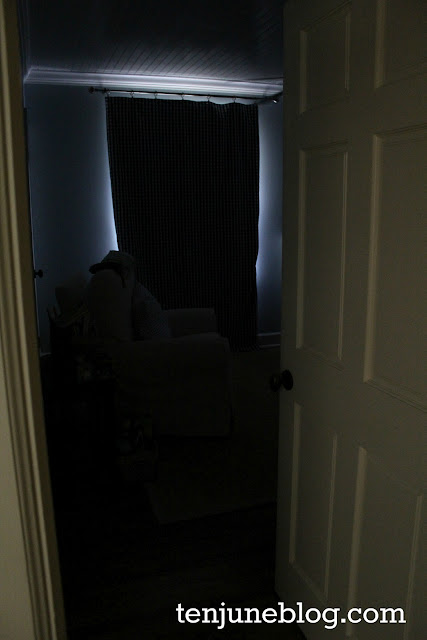
Oh and check out how dark the room gets (these photos were taken in broad daylight!) when both panels are drawn. Perfect newborn napping conditions!
So there you have it! My DIY blackout panel curtains. I'm pretty happy that I spent less than $100 on four panels instead of shelling out almost $400 over at Pottery Barn Kids. And it makes me reallllly happy that this little room is coming together!!
If you're interested in making curtains but don't have a sewing machine, check out my no-sew curtain tutorial right here!


Great job Michelle! Love the gingham pattern. It will certainly grow with the little man!!
ReplyDeleteWow, girl. Check you out. I am so proud of you. Great tutorial.
ReplyDeleteLove the gingham! So cute and not a typical choice. Great job!
ReplyDeleteLove the curtains. I just made similar ones for my home office and yes, cutting is the scariest part. I did want to say something about the dark room-- a bit of mommy advice. I'm sure you've heard this type of advice before, but just in case... When my first was born (15 years ago on the 21st of this month!) I made black-out curtains and kept everything quiet and just made him so snug and insulated. Then, the only time he would sleep was when it was dark and silent. Big mistake. I had friends whose babies would sleep anywhere and everywhere and I was like, "what the heck?" Well, a little noise and light goes a long way to making a flexible baby. I did it with my second (no choice with big brother around) and he was so much eaiser to accomodate (still is!).
ReplyDeleteI love the buffalo check pattern of these curtains. It is nice to have the room darkening fabric as your baby gets older. I have room darkening fabric lining the curtains in the boys room, and I can still trick my kids that it is the middle of the night when they try to get up at 6:00 a.m.
ReplyDeleteThey turned out adorable!! Perfect for a little boys room :)
ReplyDeleteGood job and nice straight lines! As a beginning sewer as well, that is my biggest struggle :)
ReplyDeleteThey look great, Michelle! I love them :) You're getting so good at sewing and everything!
ReplyDeleteThe nursery is really coming together!! Yay!
ReplyDeleteWow, the curtains are great! Also, your step by step tutorial looks easy enough to follow. Where is that adorable yellow rug from??
ReplyDeleteoh my gosh, such a darling nursery! great project for less $$! amazing!
ReplyDeleteThis room is looking great! Love the curtains!
ReplyDeleteWOW - girl I'm so impressed - you're inspiring me to learn to sew! You knocked these out of the park!
ReplyDeleteLove the gingham! You did a beyond wonderful job! :)
ReplyDeleteLOVE this! and what do you mean great for newborn napping! heck its good for mommy napping too!! :-)
ReplyDeleteThe room is just adorable!
the curtains look amazing!!! my kids both had gingham curtains in their nurseries- classic!
ReplyDeleteI'm a huge fan of gingham...and navy just makes it even better! Great tutorial! I just picked up liner fabric for the drape fabric I've been sitting on for about a year. Hopefully I'll put the two together before another year passes. I noticed Ikea has a sewing machine now...think a basic cheap one is fine for this type of project?
ReplyDeleteThe curtains look great! I love how they're still cute and stylish but so practical too! What an awesome idea. Can't wait for that room to having a little baby boy in it!
ReplyDeleteWhenever we move and I finally have room for a sewing machine, curtains will be one of my first projects. You did SUCH a great job and I'm sure I will be coming back to this post again and again.
ReplyDeleteGreat tutorial! They look amazing!
ReplyDeleteI live the gingham fabric. Adorable and a great price. And you'll be so happy you did the blackout liner. Henry. An sleep in a lighted room now, but I think the darker room makes him sleep longer at a time. Always a good thing.
ReplyDeleteGreat looking curtains. Thanks for showing how you made them. I've been wanting to do something like this and kinda had an idea but wasn't too sure. Yay, now I kow how someone else did it. :)
ReplyDeleteWell, look at you churning out sewing projects! These are so cute, and I know your little guy (and his tired parents!) will love them in a few weeks.
ReplyDeleteErin @ The Great Indoors
Love your blog and these cute curtains!
ReplyDeleteNew follower!
Follow me back??
Hrm. I'm trying to figure out how to make actual blackout curtains for my bedroom. It looks like yours still let a lot of light at the edges. Thank you for getting me started in the right direction though. Did you happen to find any pointers on how to stop the light around the sides and top?
ReplyDeleteHi Austin. Unfortunately, I haven't figured that out! And, as you can see, some light does come in on the sides. It doesn't bother my little guy too much, so I haven't worried about it. Perhaps you could find some weighted magnets or something? Good luck!
DeleteHi.. use to work at Lowes in the home decor section..I have heard it all... Curtains will do this!!! Even room darkening. You have two options. You can buy a room darkening blind that will filter less night though and in combination with your curtains the light would be minimal. OR B) make your rod longer then what you need by a large amt and include more curtains into the situation. If you go out 2-3 inches more on each side it would help the light situation. If you want literally NO LIGHT then get a room darkening shade.. add in room darkening curtains that are separate with a double rod.. AND make the rod an extra 2-3inches. Your room will be BLACK.
DeleteHi! These curtains are gorgeous! I'm making curtains for our nursery and this tutorial will be very helpful - thank you! The only thing I still don't understand is why the blackout fabric needs to be 6 inches less wide than the other material. Wouldn't this make the fabric be somewhat droopy against the blackout fabric? Also, would these curtains be machine washable, if needed?
ReplyDeleteHi Anne! Basically once you pull the curtain back "right side up" after sewing, your blackout panel will be framed by the regular fabric, since it's smaller. If you iron the regular fabric along the sides to create a crisp seam, it won't droop. It's sort of hard to explain, but revisit step 6 to see if that helps! Not sure about the curtains being washable, especially with the black out fabric. Mine has sort of a plastic-y liner to it... you'd have to check with the fabric manufacturer! Good luck!
DeleteLove your tutorial!! Btw, where did you purchase your yellow rug? =)
ReplyDeleteThanks! It's a Pottery Barn rug but it's been discontinued, so I bought it from EBay. It's called the "Moorish Tile" rug. Good luck!
DeleteI just used your tutorial to make curtains for our baby's room; very easy to read! Thanks!
ReplyDeleteOkay, I have never sewn anything! I must have missed something because to me it looks like you've sewn side of lining to the outermost edge of the plaid and not the other side. I want to do this and surely I am wrong and cannot read direction. ha Please help?!
ReplyDelete