Happy Halloweeners!


Happy Halloween from the Ten June crew! H Dawg will debut his very first costume tonight, which I'm so excited about. Want a hint about what he's going to be dressed as? It's green and round and rhymes with "fea fod." Gotcha there, didn't I? I'm so cryptic. Not.

So, how many of you checked out the guy's butt in the background of our little family photo? Busted!

Be safe and have fun tonight, peeps. And save me all of your Kit Kat bars!

{DIY} Burlap Football Sign

Hello, folks! Who's excited for this fall's Pinterest Challenge hosted by Sherry, Katie, Carmel and Sarah?! That'd be me! Yes, this marks my very first project since little H man was born. Aw, thanks guys. I hear y'all starting the slow clap for me through my computer screen.

I'm totally down with the whole Pinterest to project idea. In fact, if you remember, I helped Sherry and Katie host the Pinterest Challenge this summer (where I shared my scrapbook Atlanta city skyline art and you guys shared a mind-blowing 341 project links!). It was a par-tay.

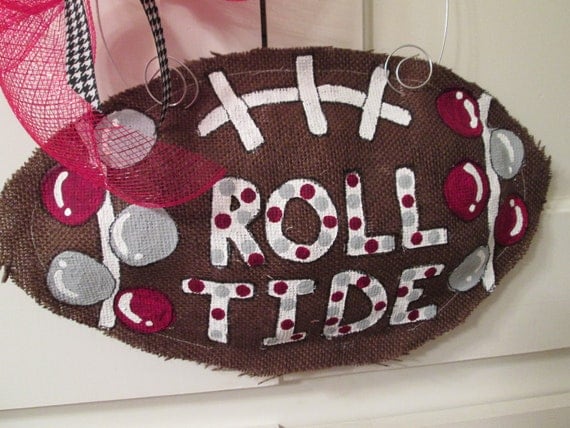
For this fall's installation of this fun challenge, I decided to do a football inspired craft. I mean, hello, isn't that what fall is all about? For some time, I've spied burlap signs all over Pinterest- birthday signs, wedding signs, seasonal signs. But when I saw a burlap football sign, it was all over. Totally my piece of cake! Well, besides the piece of cake. I'm confusing myself now.


Ta da. My very own burlap football lemon sign. 


Yes, it's kind of shaped like a lemon. I won't judge if you won't.
 

All you need is a piece of burlap, picture hanging wire and some paint in your favorite team's colors. 


I painted the burlap with regular craft paint. I plan to seal it with a clear, glossy spray but it has been way too windy the last couple of days (thanks Sandy!), so I haven't gotten to that step yet. I think the clear spray will make the burlap stiffer (so it will hang better) and help to prevent any fraying on the edges of the burlap.


I plan to hang the sign on our front door every game day. I strung picture hanging wire through the top part of the burlap fabric and simply hung on my front door. Easy peasy.

B T dubs...yes, I know that we're like 80% through the entire college football season... but, better late than never. And UGA is kicking butt and taking names this year, so hopefully we'll have a great post-season as well! Those pro-football fans out there still have plenty of time to get one of these up for your favorite team!


So tell me, which team would you paint a sign for?

Country Living Magazine Fair

What do you get when you add a bajillion awesome antiques + crafts, a field full of creative women and some gorgeous fall weather? Why, the Country Living magazine fair, of course! 

This past weekend, I spent my Saturday at Stone Mountain Park (right outside of Atlanta) at the Country Living Fair. I went with one of my favorite favorite girls, Katelyn. I couldn't have picked a better partner to attend the fair with- we had a ball! Or really, we had a pumpkin....


A bunch of local bloggers met up for the event, but I was running a tad behind (blame it on the baby, of course!) so we missed meeting up with them.

The fair was essentially a collection of demonstrations and presentations by Country Living Magazine editors on all of our favorite Country Living topics. I honestly didn't get a chance to experience any of the presentations fully... I was too wrapped up in the other part of the fair: the shopping.


There were hundreds of amazing vendor booths set up throughout the fair with goods ranging from rustic antiques to funky crafts to sensational food.


I kind of wanted to buy everything within the fair grounds, but instead I bought a couple of fun little decor items. One of my favorite buys was this "you are my sunshine" sign. Perfect to hang in my house for me to sing to my two boys!


While I didn't bring it home with me, I drooled over this chair. Amazeballs.


And I probably should have taken the vintage "M" sweater home with me. Represent.


While the vendors and presenters were from all over, I loved the southern touch everything had. A natural cotton garland? Only in the south, baby. How pretty would that look on my mantel?! 


Oh and don't forget the food... Katelyn and I chowed down on some BBQ for lunch. Yum.


All in all, I'd say the fair was a success. I got a few cute things (more on those later!) and had an amazing day with one of my favorite girls. It was actually the longest I've been away from little HDawg... but he and his daddy spent the day shopping for suits (dang those Jos. A. Bank suit sales and their control over my husband!) and watching the Georgia bulldogs KICK FLORIDA'S BUTT!

And because I think it's hilarious... I had to pump in the car during the middle of our day (yes, I said that... I pumped in my car in the fair parking lot... you're thinking thank goodness you didn't walk by that, right?!) and my pump ran out of batteries. Yeah, total fail. Katelyn and I wandered back into the fairgrounds searching for batteries, only to realize that none were being sold. We stopped to ask the information booth if they knew where I could buy batteries (I think they thought it was for a camera or something... good thing they didn't pry too much, ha!) and they graciously gave me some. So if you're out there reading this, wonderful fair workers... thank you!

Thanks to Country Living Magazine (my favorite publication, ev-er!) for hosting such a fun day!

So Very Pinteresting

Do you know how hard it is to do things with just one hand? It's amazing how quickly I've learned to balance eight grocery bags on one arm, to chicken peck my way through an email and to open the milk gallon with two fingers! What am I talking about? Life as a new momma... with one arm constantly holding the baby, handling even the smallest task just isn't the same!

But one thing I can do? My iPhone. I can text, email and surf the Internet all with one hand. It's amazeballs. Although, I still haven't figured out how to leave comments on your blogs via my phone (Kim recommended the Newsify app which is great, but I still can't figure out an easy way to comment without logging into Blogger... any suggestions?).

My favorite one-handed iPhone task is, hands down (ha), Pinterest. Word to your motha. I have logged many a late night hour blowing up your Pinterest feed over the last few weeks, people. And my goodness have I found some major stuff. Like, borrow Baby H's burp cloth to wipe up my drool kind of major.


 via Kris Kraft


In addition to beautiful interiors, Pinterest is also good for fun tips and tricks. I love pinning informative stuff like this "how to mix patterns" tool on my Tips, Tricks & Tutorials board.


For more fabulous fun, come find and follow me on Pinterest

Alright, spill the beans. What have you been drooling over lately?

{DIY} Moustache Drinking Glass Tutorial


While I'm out loving on my brand new baby boy, I hope you enjoy this series: my favorite DIY rerun posts! Learn more about the series here and check out some of the previous posts here.

**

As I'm sure you guys have noticed, I'm a big fan of DIYing my way through things. So, it was kind of natural for me to throw in a few do-it-yourself Christmas presents for friends and family this year.

For the record, I know I'm incredibly frugal most of the time. But, I promise!!, the DIY Christmas gift approach was not just my attempt at being a complete and total cheap-o. Many of these were gifts that were made in addition to other presents or were "handmade" gift exchanges, where most people brought baked goods. Just wanted to throw that out there :)

Throughout the last few months, I've been bookmarking ideas that I've seen out in blog world, with thoughts like- "ohh, my mom would LOVE that!" and "what a wonderful gift idea!" So, I decided it was high time to get my glue gun out and actually make some of these projects come to life.

So, THANK YOU for having such wonderful ideas, my friends.
Because, thanks to you, I just copycatted my way through Christmas : )

my gift to my sister
MOUSTACHE GLASSES

thanks to Jen over at Tatertots & Jello


When I saw this post on Jen's blog, I knew I had to recreate this fabulous gift for someone. And the perfect candidate became my little sister, Callie. She's a freshman in college (remember the dorm room art I made her back in August?) who is always in need of basic house items for her dorm room. Plus, she loves to ham it up with her roommates, so you can see that this is the perfect little gift.

Supplies:
-drinking glasses (I got mine in a 12 pack at WalMart for $8)
-glass paint (I used the Folk Art Enamel brand, sold at most craft stores)
-paint brush
-oven
-some mad moustache-making skillz

All ya gotta do is paint away to your heart's desire! I used an enamel-based glass paint, so after I made a masterpiece out of each glass, I let the paint dry for about an hour. Then, I threw the glasses on a cookie sheet and put them in my room temperature* oven at 350 degrees for about thirty minutes.

*HINT: don't put the glasses into a hot oven!! They would blow up or something and that would be bad news!

This makes the paint completely dishwasher safe.


Seriously, how awesome are these glasses?!

And they're even better when they're being used and the drinker because the moustache-wearer!!


Love it. I think she'll have fun with that one!

{DIY} Custom Bathroom Vanity


While I'm out loving on my brand new baby boy, I hope you enjoy this series: my favorite DIY rerun posts! Learn more about the series here and check out some of the previous posts here.

***

 
 David and I are nearing home plate with our master bathroom renovation. We tackled some major end-of-the-road projects over the weekend (like running water... as in, I can brush my teeth in there! This is finally happening!). And one project that we can finally cross off of our list is the vanity.

We installed the bathroom vanity four times. I told you all about the first install here, with the Pottery Barn vanity that I wanted for about two years and then fell madly out of love with as soon as it hit our doorstep. Takes two, three and four all occurred with the Home Depot vanity I mentioned last week. Let me backtrack.

After the Pottery Barn vanity snafu, David and I decided to buy a white builder-grade vanity (approximately $300) from Home Depot and dress it up to suit our fancy. Here she is right out of the box.


I pulled our samples from various other parts of the room and realized that we needed a kick of a darker color to tie the look together. David's genius idea- let's paint the vanity a dark, charcoal gray!


And dark, charcoal gray she went!

   
Using the laminate painting tutorial I described in my entryway shelf project, I primed the vanity with Zinsser and then layered it with a few coats of Martha Stewart's Cement Gray. I'm in love.


But unfortunately we still had to reinstall this vanity... thus vanity install attempts two, three and four!

Because of the nature of the open scheme of our first PB vanity choice, we had the plumbers fix the pipes so that they came up from the floor instead of from the wall (so they could be easily covered and not hanging out all over the place). Of course, we didn't end up choosing the open vanity option, so that was all for naught. Oh well. No harm, right? Ahem... as David and I attempted worked to install the new Home Depot vanity, we realized that it couldn't fit over the piping as it was laid out. Road block. So we had to get some help (in the form of our local handyman) to move the vanity over so that it fit over the pipes...which meant moving the matching electrical sockets and lighting as well. I know- it's like one of those "if you give a mouse a cookie" scenarios! Unfortunately it took our guy two attempts to install the vanity so that it's just perfect, rounding out four full (and final!) attempts at getting this bad boy in.

But oh, is it worth it.


The details are my favorite part. 


Some of you guessed that I bought knobs for the vanity at the Hobby Lobby sale that I mentioned last week. While I did shop the sale for vintage-looking glass knobs (the direction I knew I wanted to go for some extra glam), the HL glass knobs were actually a tad bit bigger than we wanted on the vanity. The glass knobs I ended up choosing here are from Home Depot (but more on the HL knob project soon!).


I'm absolutely in love with the soft runner bath mat, silver jewelry tray and silver "mint julep" cup/vase/anything we want it to be that I found at Marshalls.


All of our fixtures in the room are a shiny chrome (so shiny you can see me taking a picture!).
They are also from Home Depot- the "Banbury" by Moen line.


This week is the install of the mirrors above the vanity, but for now we're using an extra mirror from around the house. Gotta say cheese while I'm brushing my teeth, right?


I'm absolutely in love with the way it turned out- even if it took four attempts. Every time I walk by the bathroom, I run and grab David- "Babe! Seriously, look how good it looks!" I'm a happy camper.

Can't you tell?


Want to learn more about our master bathroom renovation? Check out all the gory details, from start to finish:


Related Posts Plugin for WordPress, Blogger...